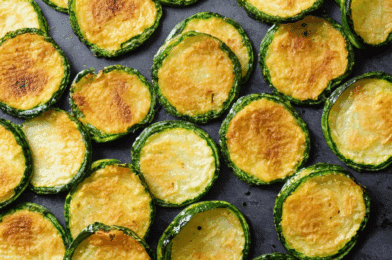
Creamy Garlic Chicken

I recently had the pleasure of preparing a delightful dish that quickly became a family favorite: Creamy Garlic Chicken. This recipe combines the aromatic flavors of garlic with a rich, velvety sauce that envelops tender chicken breasts. From the very first bite, my family was hooked. The creamy texture and savory garlic flavor perfectly complement the juicy chicken, creating a meal that satisfies both the palate and the soul. Whether served on a busy weeknight or as a centerpiece for a special occasion, this dish is sure to impress and leave everyone craving more.

Ingredients

The beauty of Creamy Garlic Chicken lies in its simplicity and the quality of ingredients used. To recreate this flavorful dish, you will need the following:

  • 4 boneless, skinless chicken breasts
  • Salt and pepper to taste
  • 2 tablespoons olive oil
  • 1 tablespoon butter
  • 6 cloves garlic, minced
  • 1 cup chicken broth
  • 1 cup heavy cream
  • 1/2 cup freshly grated Parmesan cheese
  • 1 tablespoon chopped fresh parsley

Each ingredient plays a crucial role in crafting the dish’s harmony of flavors. The Parmesan cheese adds richness, while the fresh parsley provides a hint of freshness that balances the creamy sauce beautifully.

Instructions

Creating this Creamy Garlic Chicken dish may seem daunting, but with clear step-by-step instructions, you’ll find it both manageable and rewarding. Start by seasoning the chicken breasts with salt and pepper. In a large skillet, heat the olive oil over medium-high heat. Add the chicken breasts and cook for about 6-7 minutes on each side, ensuring they are golden brown and cooked through. Remove the chicken from the skillet and set aside.

In the same skillet, reduce the heat to medium and add butter. Once melted, add the minced garlic and sauté until fragrant, approximately 1 minute. Pour in the chicken broth, stirring to scrape up any browned bits from the bottom of the skillet. Allow the broth to simmer for about 5 minutes, reducing slightly.

Next, stir in the heavy cream and Parmesan cheese, allowing them to melt and blend into a smooth, creamy sauce. Return the chicken breasts to the skillet, spooning the sauce over them. Let them simmer gently in the sauce for another 5 minutes, allowing the flavors to meld. Finish by sprinkling freshly chopped parsley over the top before serving.

Nutrition Facts

Understanding the nutritional content of the meals we prepare is essential for maintaining a balanced diet. This Creamy Garlic Chicken recipe serves four people, with each serving containing approximately 450 calories. The combination of protein from the chicken, healthy fats from the olive oil and butter, and the calcium-rich Parmesan cheese make this dish both nourishing and satisfying.

Preparation Time

Time is often of the essence when it comes to meal preparation, and this dish is ideal for those with busy schedules. From start to finish, preparing Creamy Garlic Chicken takes about 30 minutes. This includes 10 minutes for prep time and 20 minutes for cooking, making it a perfect option for a quick and delicious meal without compromising on flavor or quality.

How to Serve

Enhance your dining experience by serving Creamy Garlic Chicken with complementary sides. Here are some serving suggestions to consider:

  • Over pasta: Serve the chicken and sauce atop a bed of your favorite pasta for a comforting meal.
  • With rice: Pair the dish with fluffy white or brown rice to soak up the delicious sauce.
  • With a side of vegetables: Steamed or roasted vegetables like broccoli or asparagus make a healthy and colorful accompaniment.
  • With crusty bread: Use slices of crusty bread to mop up the creamy sauce, ensuring no drop is wasted.
  • With a salad: A light, refreshing salad balances the richness of the dish and adds a crisp texture.

Additional Tips

To further enhance your cooking experience, consider these additional tips:

  1. Use fresh garlic: Fresh minced garlic will impart a more robust flavor compared to pre-minced options.
  2. Choose quality Parmesan: Opt for freshly grated Parmesan cheese instead of pre-packaged varieties for a richer taste.
  3. Adjust seasoning: Taste the sauce before serving and adjust the seasoning with salt and pepper as needed.
  4. Thickening the sauce: If you prefer a thicker sauce, allow it to simmer longer to reduce further, or add a cornstarch slurry.
  5. Herb variations: Experiment with different herbs such as thyme or basil for a unique twist on the classic recipe.

FAQ

Here are some frequently asked questions about making Creamy Garlic Chicken:

Q: Can I use chicken thighs instead of breasts?

A: Yes, chicken thighs can be used. They may require a slightly longer cooking time to ensure they are cooked through.

Q: Can I make this dish ahead of time?

A: While it’s best served fresh, you can prepare the sauce ahead of time and reheat it before adding the chicken for a quick meal.

Q: What can I use instead of heavy cream?

A: You can substitute heavy cream with half-and-half or a mixture of milk and cornstarch for a lighter option.

Q: How can I make this dish dairy-free?

A: Use coconut cream or a dairy-free cream alternative and nutritional yeast instead of Parmesan cheese.

Q: Can I freeze leftovers?

A: Yes, you can freeze leftover chicken and sauce in an airtight container for up to 2 months. Thaw and reheat gently before serving.

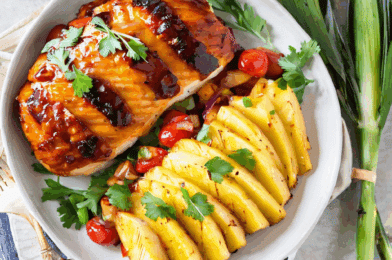
Pineapple BBQ Baked Chicken Breast

When I first tried the Pineapple BBQ Baked Chicken Breast, it was a delightful surprise. The combination of tangy pineapple and smoky BBQ sauce created an explosion of flavors that had my family coming back for seconds. The chicken was tender and juicy, perfectly absorbing the sweet and savory marinade. Even my picky eaters were impressed, and it quickly became a requested dish for family gatherings. The recipe is not only simple but also allows for some creativity, as you can tweak the ingredients to suit your taste. It’s a dish that never fails to bring smiles to the dinner table, making it a staple in our household.

Ingredients

To make this delicious Pineapple BBQ Baked Chicken Breast, you’ll need the following ingredients:

  • 4 boneless, skinless chicken breasts
  • 1 cup BBQ sauce
  • 1 cup pineapple chunks (fresh or canned)
  • 1 tablespoon olive oil
  • 2 cloves garlic, minced
  • 1 teaspoon paprika
  • Salt and pepper to taste
  • Optional: fresh cilantro for garnish

Instructions

Follow these steps to prepare the Pineapple BBQ Baked Chicken Breast:

  1. Preheat your oven to 375°F (190°C).
  2. In a bowl, mix the BBQ sauce, pineapple chunks, olive oil, minced garlic, and paprika.
  3. Season the chicken breasts with salt and pepper, then place them in a baking dish.
  4. Pour the pineapple BBQ mixture over the chicken, ensuring each piece is well-coated.
  5. Bake in the preheated oven for 25-30 minutes, or until the chicken is cooked through and reaches an internal temperature of 165°F (74°C).
  6. Remove from the oven and let it rest for a few minutes before serving.
  7. Garnish with fresh cilantro if desired, and serve warm.

Nutrition Facts

This recipe serves 4 people. Each serving contains approximately 350 calories, making it a healthy choice for a satisfying meal.

Preparation Time

The total preparation time for this dish is approximately 45 minutes, including both prep and cooking time.

How to Serve

  • Serve with a side of steamed rice or quinoa for a complete meal.
  • Pair with a fresh green salad for a light and healthy option.
  • Consider adding roasted vegetables, such as broccoli or bell peppers, for added nutrition.
  • Top with additional BBQ sauce or pineapple slices for extra flavor.
  • For a tropical twist, serve with a side of coconut-infused rice.

Additional Tips

Here are some tips to enhance your Pineapple BBQ Baked Chicken Breast:

  1. Marinate Longer: For deeper flavor, marinate the chicken in the pineapple BBQ mixture for at least 2 hours before baking.
  2. Grill Instead: For a smoky flavor, consider grilling the chicken instead of baking it.
  3. Spice It Up: Add a pinch of cayenne pepper or chili flakes to the sauce for a spicy kick.
  4. Use Fresh Pineapple: While canned pineapple is convenient, using fresh pineapple can enhance the flavor.
  5. Check Doneness: Always use a meat thermometer to ensure the chicken is fully cooked.

FAQ Section

  1. Can I use chicken thighs instead of breasts? Yes, chicken thighs can be used, but they may require a slightly longer cooking time.
  2. Is it possible to make this recipe vegan? You can substitute chicken with tofu and use vegan BBQ sauce for a plant-based option.
  3. Can I prepare this dish in advance? Yes, you can prepare the sauce and marinate the chicken a day ahead, then bake it when ready to serve.
  4. What can I use instead of BBQ sauce? If you don’t have BBQ sauce, you can use teriyaki sauce or a mixture of soy sauce and honey as an alternative.
  5. How do I store leftovers? Store any leftovers in an airtight container in the refrigerator for up to 3 days.

Crockpot Chicken Parmesan Soup

The comforting aroma of Crockpot Chicken Parmesan Soup wafting through a home is enough to make any family eagerly gather around the table. This dish, a delightful twist on the classic Italian favorite, has quickly become a staple in my household. The rich blend of flavors, coupled with the simplicity of preparation, makes it a winner in my book. My family, who are often my toughest critics, raved about the creamy texture and the robust taste that seemed to improve with every spoonful. The ease of using a crockpot means I can set it up in the morning, and by dinner time, we have a hearty meal ready to enjoy. It’s a dish that brings warmth to our hearts and smiles to our faces, especially during those chilly evenings.

Ingredients

To create this flavorful Crockpot Chicken Parmesan Soup, you will need the following ingredients:

  • 2 pounds of boneless, skinless chicken breasts
  • 1 tablespoon of olive oil
  • 1 large onion, diced
  • 4 cloves of garlic, minced
  • 28 ounces of crushed tomatoes
  • 4 cups of chicken broth
  • 1 teaspoon of dried basil
  • 1 teaspoon of dried oregano
  • Salt and pepper to taste
  • 1 cup of grated Parmesan cheese
  • 1 cup of pasta (such as small shells or ditalini)
  • Fresh basil for garnish

Instructions

Begin by setting your crockpot to the sauté setting. Add the olive oil, and once heated, sauté the diced onion until translucent. Following this, add the minced garlic and sauté for another minute until fragrant. Place the chicken breasts into the crockpot, then pour in the crushed tomatoes and chicken broth. Stir in the dried basil, oregano, salt, and pepper. Cover the crockpot with its lid and set it to cook on low for 6-8 hours or on high for 3-4 hours.

Once the chicken is cooked through, remove it from the crockpot and shred it using two forks. Return the shredded chicken to the pot and add the pasta. Cook for an additional 20-30 minutes on high until the pasta is tender. Stir in the grated Parmesan cheese, allowing it to melt and integrate into the soup. Serve the soup hot, garnished with fresh basil for a touch of color and added flavor.

Nutrition Facts

This recipe serves approximately 6 people. Each serving contains about 350 calories, making it a balanced meal that’s both nutritious and satisfying. The soup provides a good source of protein from the chicken and cheese, along with essential vitamins and minerals from the tomatoes and herbs.

Preparation Time

The preparation time for this Crockpot Chicken Parmesan Soup is minimal, requiring about 15 minutes of active preparation. This includes gathering and chopping the ingredients before they are added to the crockpot. The cooking process itself is mostly hands-off, with the crockpot doing the bulk of the work over several hours.

How to Serve

  • Serve the soup in large bowls to showcase the hearty ingredients.
  • Pair it with a side of crusty bread for dipping.
  • Add a simple side salad for a refreshing contrast.
  • Top with extra Parmesan cheese for a richer flavor.
  • Accompany with a glass of your favorite red wine to complete the meal.

Additional Tips

Creating the perfect Crockpot Chicken Parmesan Soup is an art, and these additional tips will help you elevate the dish:

  • Tip 1: For a creamier texture, add a splash of heavy cream or half-and-half during the last 15 minutes of cooking.
  • Tip 2: If you prefer a bit of heat, sprinkle in some red pepper flakes.
  • Tip 3: Use freshly grated Parmesan cheese for a more robust flavor, as pre-grated cheese can be less flavorful.
  • Tip 4: To make the soup gluten-free, use gluten-free pasta or substitute with rice.
  • Tip 5: Leftovers can be stored in the refrigerator for up to 3 days or frozen for up to 3 months.

FAQ Section

Q1: Can I use chicken thighs instead of chicken breasts?

A1: Yes, chicken thighs can be used for a richer flavor. Ensure they are boneless and skinless for the best results.

Q2: Can I make this soup in advance?

A2: Absolutely. This soup can be made ahead of time and stored in the refrigerator or freezer until you’re ready to reheat and serve.

Q3: Is it possible to add vegetables to the soup?

A3: Definitely! Adding vegetables like spinach, zucchini, or bell peppers can enhance the nutritional value and flavor of the soup.

Q4: How can I thicken the soup if it’s too thin?

A4: If the soup is too thin, try adding a slurry of cornstarch and water, or simply let it simmer with the lid off to reduce the liquid.

Q5: Can I use a different type of cheese?

A5: While Parmesan is traditional, you can experiment with other cheeses like mozzarella or provolone for a different taste and texture.

Air Fryer Zucchini Chips

In our household, the air fryer has become an indispensable kitchen gadget, and one of our favorite go-to recipes is air fryer zucchini chips. With their crisp texture and subtle flavor, these chips have quickly become a family favorite. My kids, who generally shy away from vegetables, gobble them up with enthusiasm. Even my husband, a self-proclaimed potato chip aficionado, finds them hard to resist. The air fryer zucchini chips offer a healthier alternative to traditional fried snacks, maintaining a satisfying crunch without the excess oil. It’s a recipe that strikes the perfect balance between indulgence and nutrition, making it a staple in our weekly meal rotation.

Ingredients

To make these delightful air fryer zucchini chips, you’ll need the following ingredients:

  • 2 medium zucchinis, sliced thinly
  • 1 cup of panko breadcrumbs
  • 1/2 cup of grated Parmesan cheese
  • 1 tsp garlic powder
  • 1 tsp onion powder
  • 1/2 tsp salt
  • 1/2 tsp black pepper
  • 2 large eggs, beaten
  • Olive oil spray

Instructions

Follow these steps to prepare your air fryer zucchini chips:

  1. Preheat your air fryer to 400°F (200°C).
  2. In one bowl, mix together the panko breadcrumbs, grated Parmesan, garlic powder, onion powder, salt, and pepper.
  3. In a separate bowl, beat the eggs until smooth.
  4. Dip each zucchini slice into the egg mixture, ensuring it’s fully coated, then dredge it in the breadcrumb mixture, pressing gently to adhere.
  5. Arrange the coated zucchini slices in a single layer in the air fryer basket, making sure not to overcrowd them.
  6. Lightly spray the zucchini slices with olive oil spray.
  7. Air fry for 8-10 minutes, flipping halfway through, until golden brown and crispy.
  8. Remove from the air fryer and let cool slightly before serving.

Nutrition Facts

This recipe yields approximately 4 servings. Each serving contains around 150 calories.

Preparation Time

The preparation time for this recipe is about 10 minutes, with an additional 10 minutes for cooking. In total, you can expect to have your zucchini chips ready to enjoy in just 20 minutes.

How to Serve

Here are some suggestions for serving your air fryer zucchini chips:

  • As a delightful snack on their own.
  • Paired with a tangy marinara sauce for dipping.
  • Alongside a grilled chicken breast or steak for a balanced meal.
  • As a crunchy topping for a fresh garden salad.
  • With a creamy ranch or blue cheese dressing for dipping.

Additional Tips

Maximize your air fryer zucchini chip experience with these helpful tips:

  1. Uniform Slices: Use a mandoline slicer to ensure even thickness of zucchini slices for consistent cooking.
  2. Preheat the Air Fryer: Always preheat your air fryer to ensure the chips cook evenly and become crispy.
  3. Don’t Overcrowd: Arrange the zucchini slices in a single layer to allow air to circulate freely, ensuring crispiness.
  4. Adjust Seasoning: Feel free to experiment with different seasonings like paprika or cayenne for a spicy kick.
  5. Use Fresh Zucchini: Opt for fresh, firm zucchinis to avoid soggy chips and ensure the best flavor and texture.

FAQ

Q: Can I use a different type of cheese?

A: Yes, feel free to substitute Parmesan with another hard cheese like Pecorino Romano for a different flavor profile.

Q: How do I store leftover zucchini chips?

A: Store them in an airtight container at room temperature for up to two days to maintain their crispness.

Q: Can I make these chips without breadcrumbs?

A: Absolutely! You can use almond flour or crushed pork rinds as a low-carb alternative to breadcrumbs.

Q: What if I don’t have an air fryer?

A: You can bake them in the oven at 400°F (200°C) for 15-20 minutes, flipping halfway through, to achieve similar results.

Q: Can I freeze the zucchini chips?

A: It’s not recommended to freeze them as they may lose their crisp texture upon thawing. It’s best to enjoy them fresh.

Pineapple Pecan Cheese Ball

When I first encountered the Pineapple Pecan Cheese Ball, I was a bit skeptical about how the combination of pineapple and cheese would work. However, after trying the recipe, it quickly became a family favorite. The sweetness of the pineapple perfectly balances the creamy and savory flavors of the cheese and pecans, creating a delightful appetizer that leaves everyone wanting more. My family loves gathering around the table and enjoying this delicious treat during special occasions and holiday gatherings. The cheese ball is not only a feast for the taste buds but also an eye-catching centerpiece for any party spread.

Ingredients

To create this tantalizing Pineapple Pecan Cheese Ball, you will need the following ingredients:

  • 2 cups of shredded sharp cheddar cheese
  • 1 package (8 oz) of cream cheese, softened
  • 1 can (8 oz) of crushed pineapple, drained
  • 1/2 cup of finely chopped green onions
  • 1/2 cup of finely chopped pecans
  • 1/4 teaspoon of garlic powder
  • 1/4 teaspoon of salt
  • 1 cup of chopped pecans for coating

Instructions

Creating the Pineapple Pecan Cheese Ball is a straightforward process that even beginners can master. Follow these simple steps to impress your guests with this savory delight:

  1. In a large mixing bowl, combine the shredded cheddar cheese, cream cheese, crushed pineapple, chopped green onions, finely chopped pecans, garlic powder, and salt. Mix until all the ingredients are well combined.
  2. Once the mixture is evenly combined, shape it into a ball. You may find it helpful to use plastic wrap to assist in shaping the mixture.
  3. Place the chopped pecans on a flat surface and roll the cheese ball over them, ensuring the entire exterior is coated with pecans.
  4. Once coated, wrap the cheese ball in plastic wrap and refrigerate for at least two hours or until it’s firm.
  5. Before serving, allow the cheese ball to sit at room temperature for about 15 minutes to enhance its flavors.

Nutrition Facts

This recipe yields approximately 12 servings, with each serving containing around 200 calories. The Pineapple Pecan Cheese Ball is a delightful indulgence that provides a satisfying balance of flavors without overwhelming your dietary goals.

Preparation Time

Preparing the Pineapple Pecan Cheese Ball is a relatively quick process, making it an ideal option for both planned events and spontaneous gatherings. The entire preparation, including chilling time, takes approximately 2 hours and 30 minutes. Actual hands-on time is about 30 minutes, allowing you to focus on other aspects of your event while the cheese ball firms up in the refrigerator.

How to Serve

Serving the Pineapple Pecan Cheese Ball can be as creative as you like. Here are a few suggestions to enhance your presentation:

  • Accompany with Crackers: Serve the cheese ball with a variety of crackers to complement its flavors.
  • Fresh Fruit: Arrange slices of fresh fruit, such as apples or grapes, around the cheese ball for a refreshing touch.
  • Vegetable Sticks: Include an assortment of vegetable sticks like celery and carrots for a crunchy contrast.
  • Breadsticks: Offer breadsticks for a classic pairing that guests will enjoy.
  • Charcuterie Board: Incorporate the cheese ball into a larger charcuterie board with meats, cheeses, and olives for a sophisticated spread.

Additional Tips

To ensure your Pineapple Pecan Cheese Ball is a standout dish, consider these additional tips:

  1. Drain the Pineapple Thoroughly: Ensure the crushed pineapple is well-drained to prevent excess moisture from affecting the texture of the cheese ball.
  2. Chill Time is Key: Allowing the cheese ball to chill properly ensures it holds its shape and enhances the flavors.
  3. Room Temperature Serving: Let the cheese ball sit at room temperature for a few minutes before serving to bring out the full flavor profile.
  4. Customize the Coating: Feel free to experiment with different coatings, such as crushed almonds or walnuts, for a unique twist.
  5. Make Ahead: The cheese ball can be prepared a day in advance, making it a convenient option for stress-free entertaining.

FAQ Section

Q: Can I use a different type of cheese?

A: Absolutely! Feel free to substitute the sharp cheddar cheese with your preferred cheese variety, such as Monterey Jack or Colby, to suit your taste preferences.

Q: What if I don’t have pecans?

A: No problem! You can use other nuts like walnuts or almonds as an alternative to pecans. Each will bring its own unique flavor to the dish.

Q: How long can the cheese ball be stored?

A: The cheese ball can be stored in the refrigerator for up to one week. Make sure it is wrapped tightly in plastic wrap to maintain freshness.

Q: Can I freeze the cheese ball?

A: Yes, you can freeze the cheese ball. Wrap it tightly in plastic wrap and place it in an airtight container. Thaw in the refrigerator for several hours before serving.

Q: Is this recipe suitable for vegetarians?

A: Yes, this Pineapple Pecan Cheese Ball is vegetarian-friendly, provided the cheese used is free from animal rennet. Always check the label to ensure it meets your dietary requirements.